Tuesday, September 20, 2016

Im Back Finally

Hey Everyone,
 
I know it's been a while since I've been on here or posted anything, but I am working my way back. A lot has happened since I last posted...My sister had her baby so I officially became and Auntie. Also, I underwent a couple different surgeries this summer I had my tonsils out and last week I had surgery on my carpal tunnel.  Now that I am feeling better and my hand is on the mend, I am so excited to get back into my happy place and design some beautiful new things.  I am working on a couple contracts for Baby Shower card orders, and assorted cards, and I'm sure I'll be working on Christmas cards for friends and family also. 
 
I am so excited to be back!  Stay tuned for some new things tomorrow.


Wednesday, May 4, 2016

Bellarific Friday Challenge!

Hey Ladies!  I am so happy to be back with you sharing another card.  I has been a while since I was able to post this frequently, but as I said I will be able to post a little more frequently now that some of the craziness in my life is settling down.

I decided to play along with the Bellarific Challenge this week and because I'm so engrossed in my sisters Baby Shower and the things that go along with it I thought it would be fitting to share a couple more baby themed cards that I made for some upcoming showers that I will be attending.

The Challenge over at Stamping Bella this week is to create a card using either a ribbon or washi tape.  I often struggle to create a card using washi tape, partly because I don't have very many to play with, but also because I just love tieing bows, and love how a silky ribbon just finishes off a card...especially baby cards.

I started these cards with selecting some pattern papers first and then I decided to colour the images accordingly so that they matched the papers.  I usually find that I have the greatest success and the card is very put together when doing it this way.  

Here's the fronts of the cards that I did for a couple people who don't know yet if they are having a boy or a girl, and some whom are leaving it be a surprise.


I just love the pattern papers in this paper pack and thought It was a great way to play with these papers, and found a couple polkadot papers that were in my scrap bin that matched perfectly too.

Here's the fronts of the girl cards that I did for a couple friends who are having a girl.  (My sister included)


This one didn't make it into the group picture... made 4 of them.


I don't know what it is but I also really love these pattern papers too.  I just couldn't get enough, and had to play with some of the scraps that matched too.

I am still working on the ones for boys, and will update this post with them once they are done.  I just couldn't help myself.  I was on such a roll, and had to play along with this challenge.  

Thanks for stopping by to visit and check out my cards.

Supplies Used

Paper Trimmer - used to cut the card base and the rectangular mats for the cards.
Bone Folder - used to fold and crease the card base
Stamp Press - used to attach the image to in order to stamp it on white paper
Acrylic Block - used to attach the wording to in order to stamp it.
Tweezers - used to help position the sprinkles, and help tie the bows
Tim Holtz Scissors - used to cut the bows, and for cutting out the paper pieces
Double Sided Tape - used to attach the layers together.
Foam Adhesive - used to give dimension to the sentiment
Ranger Matte Medium - used to put adhesive on the paper pieces
Promarkers - used to colour the image in
MFT Black Ink - used to stamp the outline of the image with
Ranger Inks (pink) - used to stamp the sentiment in (pink gumball)
Stickles Icicles - used to add shimmer to the images
Offray Yellow Ribbon - used for the bow and ribbon on a couple of the cards
Offray Pink Ribbon - used for the bow and ribbon on a couple of the cards
Offray Purple Ribbon - used for the bows and ribbon on a couple of the cards
Stampin Up Baby Bundle Stamp Set - used for the sentiment for the cards
Stamping Bella - Bryn has a baby shower - used as the main image for card fronts
Cuttlebug Machine - machine used with the dies to cut out various shapes
Spellbinder Die Labels 10 - used to cut out the image and the mat for the image (cannot find a link)
White Cardstock - used for the card base and background for the sentiment
Copic Cardstock 110lbs - used to stamp the image onto
Pattern Papers 
Boys - Craft Smith - Little One MP0010 pattern paper (cannot find a link)
Girls - K + Company - Snugglebug pattern paper - polkadots and wording papers

I would love if you would leave me some love below in the comment section.

Tuesday, May 3, 2016

Baby Shower Invitations for my sister

Hey All! It has been a while since I have been on here, and for that I truly do apologize.  It's been pure chaos in my life currently, there is so much going on.  I am going to be able to get on here a lot more often in the coming months, because I will be off due to surgery, and fully plan on spending a good portion of my recovery time designing more cards, and relaxing in bed while blogging!  I hope that you don't get sick of me.

I wanted to share with you a rather large project that I have been working on (part of the reason that I have been away for so long).  I have been planning and preparing for my sisters baby showers.  She is having 2 one for family (since we have a rather large extended family), and one for the ladies at our church and close friends.  We have already had 1 of her showers, and the next one is in May.  There is a good chance that the baby will be here before her family shower which would be fun :)

I had the privilege of making her baby shower invites, and because of the sizes of our family and friends group I actually designed and put together 108 baby shower invitations.

The idea was born from her bedding (colours and elephant pattern).  I just thought that this would be a great way for people to see what colours she was going to be doing the nursery in as well as her theme of elephants.  My boyfriend was a huge help when I needed some mental math done to figure out how many of each sheet of paper to purchase for these invites as well as he was a champ working the cuttle bug and helped me cut out a ton of dies!  He's so good to me!

I'm going to start with showing you the papers that I selected...


Here's a picture of the shower invites half of the way done.


Here's a finished invite...


Here's the 12 different combinations of the card that I created.  I made 9 of each card.

Supplies Used
Paper Trimmer - used to cut all of the paper.
Tim Holtz Scissors - used to trim the ribbon on the card.
2 sided tape - used to attach the pattern papers to one another.
Mono Multi - liquid glue used to adhere the large hearts.
Small Glue Dots - used to adhere the small hearts
Large Glue Dots - used to adhere the buttons to the elephants
EK Success Tweezers - used to position the hearts with
Acrylic Block - used to adhere the clear stamp to for stamping
Ribbon - from Prima Wrap
Clear Stamp - used for the wording "You're Invited" (Recollections Retired Stamp Collection - got it on clearance, but any You're Invited would do)
Blue Die Ink (Carribean Coast) -  Used to stamp wording
Purple Die Ink (Grape Soda) - Used to stamp wording  
Ink Cleaner - used to clean the ink off of the stamp
Cuttlebug - used with the dies to cut all shapes, and layers of the card.
Cuttlebug Plates - used to sandwich dies and paper for cutting
Elephant die - used to cut the elephants out
Heart Dies - used to cut the various size hearts out for the card. (Unable to find source)
Rectangle Die - used to cut the pattern paper
MFT Torn Notepad Die - used for the card base design for the card. (Unable to find link for this product)
Scallop Die - used to cut a scalloped strip for the card. (Unable to find a link for this product)
White Card Stock - used for the card bases, as well as for the elephants and large heart
Pattern Papers - found at Michaels loose stock
Blue Polka Dots - Recollection (Pattern Number Unknown)
Grey Polka Dots - Recollection (Pattern Number Unknown)
Purple Polka Dots - Recollection (Pattern Number Unknown)
Grey and White Stripes - Recollection - 317251
Blue and White Stripes - Recollection 317275
Purple Chevron - Recollection 317304
Blue Chevron - Recollection 317474
Grey Honeycomb - Recollection 317547
Purple Wag Pattern - Recollection 267048  
Solid coloured paper used for the little hearts and scalloped strip (blue, teal, purple, and grey) - scrap box (sorry no source for them...any paper would do for this)


If I happen to stumble across some of the supplies used that I wasn't able to link to I will add the link and update this post so that if you want to get your hands on these products you can.

I hope that you enjoy this post, and would love to hear your thoughts in the comment section below.  

Saturday, March 5, 2016

Seize the Birthday and MOJO 437

Hey Everyone!  I am back again with another card.  I was asked to create a couple cards for a friend of mine to give to her sister and family, and I jumped at the chance to help with this.  I played along with this challenge for my other card, and I couldn't help but play along with it again for this one in addition to another challenge.

The challenge over at Seize the Birthday is...


Then the challenge over at MOJO Monday is a sketch Challenge that I thought I would play along with too...


I love the way that this are turned out, and hope that she likes her Birthday card.

I started with a coloured image, the found a coloured card base in my stash, so had to use that and then finished it up with a saying and some embellishments.  It was an easy card, but I love how all of the elements came together to create this beautiful card. 

Here's the image that I used on my card...


Here's the side view of the finished card...


Here's the front of the card...


Supplies Used

Paper Trimmer  - used to cut various pieces of the card
Tim Holtz Scissors - used to cut the ribbon with 
Double Sided Tape - used to attach the image to the card front
EK Success Tweezers - used to help tie the bow and place the sprinkles on the card front
Foam Adhesive - used to add dimension to the sentiment and lift it off the card base
Acrylic Block - used to stamp the sentiment with
Cuttle Bug Machine  - used with the dies to cut out the sentiment and the image
MFT Pierced Circles Die - used to cut out the sentiment on the card front
MFT Pierced Square Die - used to cut out the main image on the card 
Teal Offray Ribbon - used for the bow on the front of the card (not exact product, but linked to something similar)
Promarkers - the medium used to colour the image with
MFT Ink  - used to stamp the image and the sentiment in
Penny Black - Heaven Knows - used as the main image for this card
Amy R - Its your Birthday Stamp Set - used for the sentiment on the card (cannot find a link as this stamp set is retired)
Doodlebug Sprinkles - used to help embellish the front of the card
Wink of Stella (Clear) - used to add shimmer to the card
White Cardstock - used to stamp the sentiment on 
Copic Paper - used to stamp the image on 
Cardbase - paper used for the card base (cannot find a link for it)

Thanks for stopping by to check out my cards, I would love some feedback in the comment section below! 

Have a fantastic weekend!

Seize the Birthday - Anything Goes - post #1

Hey Everyone!  Its been a couple weeks since I've posted a card on here, but don't worry I will have 2 to post so I am going to be making up for lost time.

I designed a card for a friend to give to her Brother-in-law for his birthday.  When she had asked me to do something for him I jumped at the chance.  She then made it more difficult by telling me that he loves football and that it would be amazing if I could make a card that incorporated his favourite team...Greenbay Packers.  I started by consulting my book that I have with all of my stamps (stamped) in it to see if I had anything football themed, and well...NEGATIVE on that.  I then remembered that I have a couple cricut cartridges for my cricut (which I don't use all that often for some reason).  Sure enough there was a football player in there, so I decided that if I cut his uniform in Greenbay colours then maybe this would do the trick.  I also stumbled across some pattern paper that looked like turf/grass, so knew that this would work well also.  I went through my sticker drawer and came across some football stickers, however none of them seemed all that interesting for this card, but I was able to use some of the stars.  To my surprise the stars were greens and they worked perfectly with the team colours.  I am so glad to have had the chance to create a card for her to give to her brother-in-law which will hopefully make his special day just a tad more special.

I decided that the challenge over at Seize the Birthday was a great one to play along with this week, and am excited to be able to enter this card into the challenge.

Here's the challenge:


Here's the image that I used on my card...


 Here's the front view of my card...


Supplies Used

Paper Trimmer - used to cut the pattern paper and the card base
Cricut - machine used to cut out the image (linked to newer version than my current one)
Cricut Matt - used to hold the scrap paper for cutting
Create a Friend Cartridge - this is the program/photo bank that I used and selected an image from to cut
Create a Critter Cartridge - used for the wording on the inside of the card
Stars - used on the card as embellishments
Tim Holtz Scissors - used to cut the 2 sided adhesives and foam.
EK Success Tweezers - used to help assemble Card
2 sided tape - used to adhere the background to the card base
2 sided foam adhesive - used to pop the football player up on the card
Ranger Matte Medium - used to adhere the pieces together for the football player.
White Cardstock - used for the card base
Recollection "Green Grass" Pattern Paper - used for the background of the image.
Coloured Paper- scraps from my stash
(so unfortunately no links available for them, but any solid card stock would work)

Thursday, February 18, 2016

Bellarific Friday - 1,2,3 Challenge

Hey there!  I am back already with another card to share with you.  I was so happy to be able to play along with another Stamping Bella Challenge.
When I first saw the challenge I was intrigued...
1 - stamp, 2 - papers, 3 - embellishments.
I thought that this would be a challenge that would be just that a challenge, but with some thought I was able to come up with many different ideas for this. 
Yesterday my Grandma turned  95 years old and I know that many people aren't able to say that, so I feel incredibly blessed that I am able to say this.  I wanted to make a card that was something special, and it was going to be a card that the whole family signed so it needed to be large.  I decided that this card would be used for this challenge.
I sat down and had a blast making this card and playing along with the challenge, and top it all off my Grandma was absolutely thrilled with the card, and LOVED it.
Look how cute she is.....
(I know the picture quality isn't great unfortunately)


There is something so special about getting a handmade card, and something even more incredible about being the one to create and give that card to someone so special and make their day that much better.  I love what I do and am so greatful to Stamping Bella for inspiring this card with their incredible stamp.

Here's a close up of the coloured image on the card:


Here's a side view of the card:


Here's a front view of the card:


Supplies Used

Paper Trimmer - used to cut out the image and pattern paper and card base.
Tim Holtz Scissors - used to cut the 2 sided tape and vellum
Stamp Press- used to attach cling stamp to in order to stamp image
Stamping Bella Stamp - Flower for a True Friend - image used as the focal point of the card
MFT Black Licorice Hybrid Ink - used to stamp the image in this ink
Zig Clean Colour "48" Real Brush - used to colour the image
Wink of Stella Clear Brush - used to add glitter to the flower petals.
Doodlebug Sprinkles - used to add some embellishment to the card.
Water Brush - used to move the colour around
2 sided tape - used to attach the layers together.
 Black Letters and numbers - these are very old - couldnt find identical ones, so linking to something similar.
Pattern Paper - Recollection Bold Basics
Watercolour Cardstock - used to watercolour the main image on
Vellum - used to place the black numbers on over the stem of the flowers...giving the card a whimsical feel

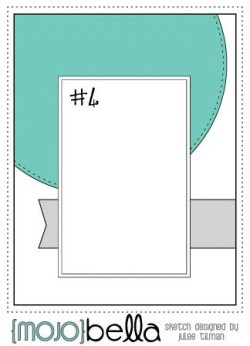
Bellarific Friday - MOJOBELLA Sketch #4

Hey there everyone!  It's been a little while since I've been on here and for that I am truely sorry.  I have been tidying my scrap space and am loving my new organization bins which I talked about in a previous post (I will post pictures soon I promise). Now that the mess is organized and I am able to find things easier I think it's for sure time to get back at creating cards and posting them to challenges, and building up my stash. 
I was so honoured to be asked by a couple of my friends to create cards for them to give to their boyfriends for Valentines Day and/or Anniversary.  The one card that I created I knew that I wanted to play along with the Bellarific Friday Sketch Challenge.  I knew what stamp and saying I would be using because I hadn't used them before so just had to play with them and design something for her.  My friend who had asked me to do the card is a teacher, and I just thought that it was perfect for me to be able to create a card with a Dr. Seuss Quote on it, and the image just went along with it so perfectly.
This is the Sketch that inspired my card:
12342711_1021139901275969_4880268470290923388_n
Leading up to me creating this card too, something that I had ordered for myself (a late Christmas gift to me) arrived in the mail and I just couldnt resist colouring the card with them.  Her card turned out so cute.
Here's the front of the card that I created:
Here's the side view of the card:


Here's the image that I used and coloured for the card:

(please be kind...this is my first time using my Prisma Colour Pencil Crayons, so I am still getting used to them)...

 Supplies Used
Paper Trimmer - used to cut the card base, the main image and sentiment and the matt
2 sided tape - used to adhere all of the layers together
Ranger Multi Matte Medium - used to adhere the sequence, and heart to the card
Tim Holtz Scissors - used to cut the tails on the ribbon
Stamp Press - used to stamp the image and sentiment onto paper
Black Licorice Ink - ink that was used to stamp the image and sentiment with
Prisma Colour Pencil Crayons - colouring medium used to colour in the image
Stamping Bella Stamp and Sentiment "In Love" - used as the main image and sentiment for the card
Water Colour Paper - this is the paper the image and wording is stamped on
White Cardstock Paper - used for the card base
Pattern Paper - scrap paper that was laying around
Plain Coloured Papers - scrap hearts that were previously cut and in my scrap box (any paper would do)
Pink Doily - used for the back ground circle layer (cant find exact doily for link - heres a link for something similar)
EK Success Tweezers - used to help put on the sequences
Doodlebug Sequence - used to add shimmer to the card
Doodlebug Twine - used to embellish the side of the card
Cuttle Bug - machine used with the diecuts to cut out hearts and banner.
MFT Fishtail Flag Dies - used to cut the pattern line paper into a flag
Heart Die Cut - used to cut the heart embellishments out for this card (can't find a link for this but will post once once I can find it)
Clear Wink of Stella - used to add shimmer to the image as well as to the diecut hearts