Saturday, March 5, 2016

Seize the Birthday - Anything Goes - post #1

Hey Everyone!  Its been a couple weeks since I've posted a card on here, but don't worry I will have 2 to post so I am going to be making up for lost time.

I designed a card for a friend to give to her Brother-in-law for his birthday.  When she had asked me to do something for him I jumped at the chance.  She then made it more difficult by telling me that he loves football and that it would be amazing if I could make a card that incorporated his favourite team...Greenbay Packers.  I started by consulting my book that I have with all of my stamps (stamped) in it to see if I had anything football themed, and well...NEGATIVE on that.  I then remembered that I have a couple cricut cartridges for my cricut (which I don't use all that often for some reason).  Sure enough there was a football player in there, so I decided that if I cut his uniform in Greenbay colours then maybe this would do the trick.  I also stumbled across some pattern paper that looked like turf/grass, so knew that this would work well also.  I went through my sticker drawer and came across some football stickers, however none of them seemed all that interesting for this card, but I was able to use some of the stars.  To my surprise the stars were greens and they worked perfectly with the team colours.  I am so glad to have had the chance to create a card for her to give to her brother-in-law which will hopefully make his special day just a tad more special.

I decided that the challenge over at Seize the Birthday was a great one to play along with this week, and am excited to be able to enter this card into the challenge.

Here's the challenge:


Here's the image that I used on my card...


 Here's the front view of my card...


Supplies Used

Paper Trimmer - used to cut the pattern paper and the card base
Cricut - machine used to cut out the image (linked to newer version than my current one)
Cricut Matt - used to hold the scrap paper for cutting
Create a Friend Cartridge - this is the program/photo bank that I used and selected an image from to cut
Create a Critter Cartridge - used for the wording on the inside of the card
Stars - used on the card as embellishments
Tim Holtz Scissors - used to cut the 2 sided adhesives and foam.
EK Success Tweezers - used to help assemble Card
2 sided tape - used to adhere the background to the card base
2 sided foam adhesive - used to pop the football player up on the card
Ranger Matte Medium - used to adhere the pieces together for the football player.
White Cardstock - used for the card base
Recollection "Green Grass" Pattern Paper - used for the background of the image.
Coloured Paper- scraps from my stash
(so unfortunately no links available for them, but any solid card stock would work)

Thursday, February 18, 2016

Bellarific Friday - 1,2,3 Challenge

Hey there!  I am back already with another card to share with you.  I was so happy to be able to play along with another Stamping Bella Challenge.
When I first saw the challenge I was intrigued...
1 - stamp, 2 - papers, 3 - embellishments.
I thought that this would be a challenge that would be just that a challenge, but with some thought I was able to come up with many different ideas for this. 
Yesterday my Grandma turned  95 years old and I know that many people aren't able to say that, so I feel incredibly blessed that I am able to say this.  I wanted to make a card that was something special, and it was going to be a card that the whole family signed so it needed to be large.  I decided that this card would be used for this challenge.
I sat down and had a blast making this card and playing along with the challenge, and top it all off my Grandma was absolutely thrilled with the card, and LOVED it.
Look how cute she is.....
(I know the picture quality isn't great unfortunately)


There is something so special about getting a handmade card, and something even more incredible about being the one to create and give that card to someone so special and make their day that much better.  I love what I do and am so greatful to Stamping Bella for inspiring this card with their incredible stamp.

Here's a close up of the coloured image on the card:


Here's a side view of the card:


Here's a front view of the card:


Supplies Used

Paper Trimmer - used to cut out the image and pattern paper and card base.
Tim Holtz Scissors - used to cut the 2 sided tape and vellum
Stamp Press- used to attach cling stamp to in order to stamp image
Stamping Bella Stamp - Flower for a True Friend - image used as the focal point of the card
MFT Black Licorice Hybrid Ink - used to stamp the image in this ink
Zig Clean Colour "48" Real Brush - used to colour the image
Wink of Stella Clear Brush - used to add glitter to the flower petals.
Doodlebug Sprinkles - used to add some embellishment to the card.
Water Brush - used to move the colour around
2 sided tape - used to attach the layers together.
 Black Letters and numbers - these are very old - couldnt find identical ones, so linking to something similar.
Pattern Paper - Recollection Bold Basics
Watercolour Cardstock - used to watercolour the main image on
Vellum - used to place the black numbers on over the stem of the flowers...giving the card a whimsical feel

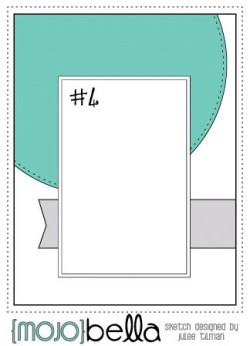
Bellarific Friday - MOJOBELLA Sketch #4

Hey there everyone!  It's been a little while since I've been on here and for that I am truely sorry.  I have been tidying my scrap space and am loving my new organization bins which I talked about in a previous post (I will post pictures soon I promise). Now that the mess is organized and I am able to find things easier I think it's for sure time to get back at creating cards and posting them to challenges, and building up my stash. 
I was so honoured to be asked by a couple of my friends to create cards for them to give to their boyfriends for Valentines Day and/or Anniversary.  The one card that I created I knew that I wanted to play along with the Bellarific Friday Sketch Challenge.  I knew what stamp and saying I would be using because I hadn't used them before so just had to play with them and design something for her.  My friend who had asked me to do the card is a teacher, and I just thought that it was perfect for me to be able to create a card with a Dr. Seuss Quote on it, and the image just went along with it so perfectly.
This is the Sketch that inspired my card:
12342711_1021139901275969_4880268470290923388_n
Leading up to me creating this card too, something that I had ordered for myself (a late Christmas gift to me) arrived in the mail and I just couldnt resist colouring the card with them.  Her card turned out so cute.
Here's the front of the card that I created:
Here's the side view of the card:


Here's the image that I used and coloured for the card:

(please be kind...this is my first time using my Prisma Colour Pencil Crayons, so I am still getting used to them)...

 Supplies Used
Paper Trimmer - used to cut the card base, the main image and sentiment and the matt
2 sided tape - used to adhere all of the layers together
Ranger Multi Matte Medium - used to adhere the sequence, and heart to the card
Tim Holtz Scissors - used to cut the tails on the ribbon
Stamp Press - used to stamp the image and sentiment onto paper
Black Licorice Ink - ink that was used to stamp the image and sentiment with
Prisma Colour Pencil Crayons - colouring medium used to colour in the image
Stamping Bella Stamp and Sentiment "In Love" - used as the main image and sentiment for the card
Water Colour Paper - this is the paper the image and wording is stamped on
White Cardstock Paper - used for the card base
Pattern Paper - scrap paper that was laying around
Plain Coloured Papers - scrap hearts that were previously cut and in my scrap box (any paper would do)
Pink Doily - used for the back ground circle layer (cant find exact doily for link - heres a link for something similar)
EK Success Tweezers - used to help put on the sequences
Doodlebug Sequence - used to add shimmer to the card
Doodlebug Twine - used to embellish the side of the card
Cuttle Bug - machine used with the diecuts to cut out hearts and banner.
MFT Fishtail Flag Dies - used to cut the pattern line paper into a flag
Heart Die Cut - used to cut the heart embellishments out for this card (can't find a link for this but will post once once I can find it)
Clear Wink of Stella - used to add shimmer to the image as well as to the diecut hearts

Thursday, January 14, 2016

Happy 2016 Everyone!

Hey All!  I know that it's been a while since I've been on here.  It's very tough with the hustle and the bustle of the holiday season to get on here with everything else that was going on. In addition to that I have been struggling with Strep throat as well as carpaltunnel in my hand, making it difficult to cards make from time to time.  I am not currently able to sit and make multiple cards at once, and I'm very lucky to make one entire card in one sitting, but I will continue to battle through this too...
  I hope that each and every one of you had a fantastic holiday season and that you got to spend some time with your family and friends creating the most incredible memories as well as enjoying the beautiful magic that Christmas brings with it.  I think it has to be one of the most incredible times of the year, to sit back and watch the magic in the kids eyes (my boyfriend's nieces and nephews and my godson and his brother).  The magic of the season in their eyes is so contageous and makes it such a beautiful time of year.  The decoration and lights just have me in awe.  The time spent with family either telling stories, laughing and creating memories and even baking with my mom is something that is so wonderful, and it wouldnt be the same without it.  Going for a stroll hand in hand through old town Niagara on the Lake with my man while doing a little bit of Christmas Shopping with warm drinks is something else that helps to create the season for me. 
While I know that this season is a beautiful one for me, I understand and acknowlege that it isn't the easiest and in some cases is a very difficult and painful season for so many others.  In all honesty my prayers and thoughts have been with so many who find the holiday season difficult and I pray that they can find even just a glimmer of hope throught it all, whether it be a smile or a kind gesture of a stranger or someone who goes out of their way for them to make the season just a little bit easier, I pray that they were able to find a little piece of beauty through that.
As for 2016 I hope that you all had a fantastic New Years and that 2016 holds only the most amazing things for each and every one of you.  This year was the first time in my life that I didnt set any personal Resolutions.  I have found in past years that I was setting Resolutions that were often very hard to accomplish and I would put a ton of stress on myself trying to accomplish them when the stress wasn't necessary.  This year I decided instead that I would create crafty resolutions for myself. 
I decided that this year I would start my year with a big overhaul and tidy of my scrapbooking / card making "nook".  Last year over Christmas I got a couple storage units that I started using for my supplies, but this year I decided that I was going to get myself a decent storage unit that I would have for years to come.  I am so lucky that I have a man that LOVES me as much as he does and whom is so handy to have around.  He worked very hard to build my storage unit and put it together so that I have a spot to store all my supplies (and it looks amazing too!)  I have been spending alot of time going through things, and sorting and organizing.  I am so thrilled with the way that it has come along, and wanted to share it with you guys (my crafting family).  
Check out these photos of my scrap nook project.

***THEY WILL BE POSTED SHORTLY***
I have used many organizational tools and methods of some well known Cardmakers and am thrilled with the way that their methods work for me and how much they make my life so much easier.  I use the Birthday Box method that Jennifer McGuire uses, as well as the same method for my stamp storage that she uses in addition to her ink swatches.  I love how these things make my life so much easier. 
Another crafty Resolution of mine is to make a very solid attempt of competing in a minimum of one challenge a week, and doing my best to post/blog my cards on a weekly basis to share with all of you!
I cannot wait for what 2016 has in store for me.  I look forward to playing along with challenges and getting on here more.  I love the continual feedback, and hope that you all continue to let me know what you think of the ideas and cards that I post. 
See you all soon!

Christmas Card Challenges #6 and ABC Christmas Card Challenges "A"

Hi Again!  I know that I missed posting the first week of January but I am making up for it now in posting 3 times this week as well as creating 2 cards to enter for 2 challenges.  I had said as one of my crafty resolutions that I wanted to post atleast once a week if possible.  I know that that isnt always ideal or reasonable as life sometimes gets in your way and prevents it, but Im going to do my very best.  The first week of January I have spent battling Strep Throat so I am trying to get back into the swing of things and make up for the one I missed this first week.  
 
and

ABC Christmas Challenge this week is:

'A is for Anything Goes'

(Just don't forget the Christmas theme!)

I know that you may or may not have seen my other post, but I did create a card to enter these 2 challenges already, but I was on a roll so decided that I was going to create a second card for each of these challenges and enter them.  Im really trying to build a stock of cards for this coming Christmas so I might as well get started early.

This card started as me trying to use up some of my scraps (I have a ton of extra snowflakes in my scrap box) so this card started out with some white snowflakes and then me deciding to make my own background with some distress inks, and it came together so perfectly.
I absolutely love this card and the way that it turned out and it was so easy to put together it might end up being something I can mass produce and it could possibly become my card for next Christmas that I hand out to most people.  Only time will tell...

Here's part of my card...

Here's another look at another part of my card...

Here's a look at the side view of my card...

and last but certainly not least...

Here's the front view of my card...

Supplies Used

Paper Trimmer - Used to cut the card base and the background paper
White Paper - used for the card base
Water Colour Paper - used to create the background on
Shimmer Cardstock - used to cut all the snowflakes out of
Scissors - used to cut the string behind the snowflake
Double Sided Adhesive - Used to attach the background to the card base
Ranger Multi Medium Matte - used to adhere the snowflakes to the background
Precision tips - used for really precise placement of glue on the snowflakes
Cuttle Bug - used to die cut snowflakes
MFT Snowflake Dies - used to cut out the largest snowflake
Paper Smooches Dies - Used to cut out the little snowflakes
Heat Tool - used to dry the inks in between water droplets
Distress Inks - used to create the background
Distress Ink Blending tools - Used to blend the ink pad colours together to create background
Shimmer Mist - Used to add shimmer to the background
Silver Thread - used behind the snowflakes to add a touch of metallic to the card
Water - from your own tap and with your hand
Klennex - used to soak up the water droplets

I was unfortunately not able to find a source for the "Merry Christmas" Wording however it is a sticker, and I was also not able to find a source for the Gems that I used for the centres of the snowflakes - any gems would work fine for recreation of this card.

Wednesday, January 13, 2016

ABC Christmas Challenge "A" and Christmas Card Challenges #6

Hey Everyone!  I hope that you all caught my first post for the year with my Christmas wishes as well as my New Year wishes.  If you missed that post please stop by to see that post. 
One of my crafty Resolutions is to get my stash of Christmas cards built early and so that I have lots of them to pass out to my friends and family.  I am going to be working at making 2 cards a week, and 3 - 5 cards of each design to help myself build a large stash for Christmas of 2016
So I thought that I would get to it, and hit the ground running, and wanted to share with you a card that I made for these 2 challenges. 
ABC Christmas Card Challenge is on the Letter "A" for Anything goes.
and
When I saw the challenges today I knew that I had lots of stamps that could work for this. I visited my scrap box... {which really is a box that extra die cut things get tossed into, ideas that dont make it to a completed card are in there too, stamped images that are/aren't coloured are in there too waiting to find their way to a card}... and found an image that was previously coloured in there that had a little blue bird and a snowman and I just couldnt help but ensure that it made it to a card.
Those of you who follow my blog know that I generally colour my images to match my papers, but in this case I had to do it opposite which was easier than I thought it was going to be. I had a ton of scrap pattern paper that were in the pile and I was able to use some papers that have been used previously which was fun instead of cutting into a new piece of paper. Yay for using up Scraps!

Here's the front of the card...

Here's the side view of the card...

Here's the coloured image that was used for the card...

Supplies Used
Fiskars Paper Trimmer - used to cut card base and pattern papers
Tim Holtz Scissors - used to cut 2 sided adhesive and ribbon
MFT Black Licorice Ink - used to stamp the image as well as the sentiment
2 sided Adhesive - used to attach papers to card base.
Ranger Matte Medium - used to attach the snowflakes to the card
Foam Tape - used to attach the sentiment and give it some dimension
Bakers Twine (Red and White) - used for tieing around the card and creating a ribbon with
Gelly Roll Pens - used to colour and add shimmer to the image
Sentiment Stamp - Recollection Set - Only able to locate it on Ebay (sorry!)
Snowman Stamp - Bird Snowman (Class Act Inc.) 
White Cardstock - Card Base as well as Paper that Image is stamped onto
Cuttle Bug Machine - used with dies to cut out the snowflakes for the card
Snowflake Dies - used to cut the snowflakes (white)
Snowflake Dies - used to cut the red snowflake (red)
Gems - used on the snowflakes to add some shimmer (exact source couldnt be found so I linked to something similar which would work too)

The pattern paper is from a retired Recollection Paperpack so unfortunately I wasnt able to locate a source.

Saturday, November 28, 2015

Cupcake Inspiration #337 - Christmas Card

Hi again.  I told you that I would be back sooner than you know.   It's been a long time since I've taken part in a Cupcake Inspiration Challenge.  Here's the challenge that I took part in...


When I looked though this one was so cute, and I couldnt help but play along.  I wanted to do a card for a birthday, however with Christmas so close and around the corner I thought that my time would be better spent making a card for Christmas with bears on them.  When I was flipping through my stamp catalogue (my book with all of my stamps shown in it) I found a couple stamps that would work for this card and I found a couple stamps that worked, but finally settled on this stamp.  If I have time I might make a second card with one of the other stamps to enter in this challenge, but I am not sure how likely that will be.

I would love to hear what your best practices are for card making for holidays.  I would love hearing how you build a stash of various cards for the holiday or various designs.  How do you stock them so that you arent scrambling last minute to get them done for everyone on your list.  Any help or feedback would be greatly appreciated.

Getting back on track.....

Here's the front of the card...


Here's the side of the card...


Here's the image I used on the card...


Supplies Used

 Paper Trimmer - used to cut the card base and various layers of the card
Bone Folder - used to fold and crease the side of the card base
Tim Holtz Scissors - used to cut the ribbon on the card
EK Success Tweezers - used to position and place the sprinkles, and help tie the bow on the card
Stamp Press - used to attach the image stamp to which aids with stamping it on the paper
Double Sided Tape - used to adhere the image and the frame onto the card front
Foam Adhesive - used to add dimension to the sentiment for this card
Promarkers - used to colour the image with
MFT Ink  - used to stamp the wording and the sentiment in
Heartfelt Creations - Bear-y Winter Stamp Set -  used one of the images for the image on this card
Recollection Holiday Greetings - used for the sentiment on this card
Cuttlebug Machine - used with the dies and the embossing folder to create the background and the frames on this card
Large Cuttlebug Snowflake Embossing Folder - used to pinch and crease the background with the snowflakes. (cannot find a link for this embossing folder)
Labels Fourteen Die - used to cut out the frame for the main image and the sentiment and sentiment mat
Offray Red Ribbon - used for the bow and ribbon on the card
Doodlebug Sprinkles - used to add red, green and white embellishments to the front of the card
Stickles - Icicles - used to add shimmer to the card, and different parts of the gifts.
Copic Paper - used to stamp the main image onto
White Cardstock - used for the card base and to stamp the wording to.
Green Shimmer Paper - used for the background of this card
Red Cardstock - used to mat the sentiment with